How-To
How to Steam Milk for Lattes at Home
Silky, paint-like microfoam is mostly technique. Here's how to use a steam wand in two phases, the temperature to stop at, the pitcher and milk that make it easy — and how to fake it if you don't have a wand.
The difference between a café-quality latte and a sad, bubbly one is almost never the espresso — it's the milk. Good steamed milk is microfoam: milk and air whipped so finely that the bubbles disappear and the whole pitcher turns glossy and thick, like wet paint or melted ice cream. That texture is what lets you pour latte art, and it's what makes the drink taste sweet and velvety instead of soapy and dry. The good news is that microfoam is mostly technique, not talent. Get the two phases, the temperature and the pitcher right and you'll be pouring silky milk within a week of practice.
This guide covers steaming milk with an espresso machine's steam wand — the way it's done in a café — plus honest workarounds if you don't have a wand. If you're still dialing in the shot underneath, start with how to pull an espresso shot first, then come back for the milk.
What you need
You need surprisingly little. The steam wand does the work; your job is to hold the pitcher and read the milk. Here's the short kit.
| Pitcher | 12-20 oz stainless steel, spouted; fill below the spout |
|---|---|
| Milk | Cold whole milk (or a barista-formula alternative) |
| Thermometer / feel | Stop at 140-150F, or when the base is too hot to hold |
| Wand or frother | Steam wand for true microfoam; frother as a backup |
Start with cold milkstraight from the fridge. Cold milk gives you a longer window to work before it overheats, and the proteins that build stable foam behave best when they start cold. Fill the pitcher to roughly the bottom of the spout — the milk expands as you add air, and a pitcher that's too full will slosh and overflow.
The two phases: stretch, then texture
Every good pour comes down to two phases in order: stretching (adding air) while the milk is still cool, then texturing(spinning it into a whirlpool) to fold that air in and heat the milk. Do all your aerating early — you can only add air to cold milk — then stop adding air and just polish the texture.
- Purge the wand first. Before the pitcher goes anywhere near it, open the steam valve for a second to blow out condensed water sitting in the wand. Watery milk is weak milk.
- Set the tip just below the surface and turn steam on full.Position the wand tip a little off-center — roughly halfway between the middle of the pitcher and the wall — and just under the surface of the milk. Open the steam all the way; a steam wand works best at full power.
- Phase one — stretch (aerate). Lower the pitcher a hair until you hear a gentle, steady tss-tss-tss, like paper tearing or a soft kiss. Each little hiss is a bite of air going in. For a latte or flat white you only want a few seconds of this — you're aiming to grow the milk by about a third. For a foamier cappuccino, stretch a couple of seconds longer. Keep the pitcher moving down just enough to keep that hiss going as the milk rises.
- Phase two — texture (whirlpool).Once you've added enough air, raise the pitcher so the tip sits fully submerged and slightly off-center. This kills the hiss and starts a whirlpool— the milk should spin in a smooth vortex, dragging the big bubbles down and breaking them into microfoam. Hold it there and let the milk keep spinning and heating. No more air goes in during this phase; you're just polishing.
- Cut the steam at temperature, then wipe the wand. When the milk hits the right temperature (next section), turn the steam off beforeyou lift the pitcher out so you don't spray milk everywhere. Immediately wipe the wand with a damp cloth and purge it again — dried milk is a pain and a hygiene problem. Our how to clean a milk frother guide has the full routine, including what to do once milk has already baked on.
- Groom and pour.Swirl the pitcher hard to fold any lingering foam back in, and tap it once on the counter to pop surface bubbles. The milk should look like glossy wet paint with no visible bubbles. Pour within a few seconds — microfoam separates as it sits.
The right temperature (and why hotter is worse)
Milk is sweetest and silkiest in a fairly narrow band. Aim to stop at about 140–150°F (roughly 60–65°C). In that range the milk's natural sugars taste their sweetest and the proteins hold a stable, glossy microfoam. It will feel hot but not scalding.
Above roughly 160°F (about 70°C) the milk starts to scald: the proteins and enzymes break down, the milk loses sweetness and picks up a papery, cooked flavor, and the foam turns stiff and unstable. Blast past that and you get the burnt-milk taste of a gas-station latte. Hotter is not better — it's the single most common way home drinks go wrong.
You don't strictly need a thermometer. The classic barista feel test: keep a bare hand on the base of the pitcher, and cut the steam the moment it becomes too hot to hold. That point lands right around the top of the target range. A clip-on or stick thermometer removes the guesswork while you're learning — watch it climb and pull off a couple of degrees early, because milk keeps rising in temperature for a second after the steam stops.
Common mistakes
If your microfoam isn't coming together, it's almost always one of these:
- Overheating.Blowing past 150°F kills the sweetness and stiffens the foam. Stop earlier than feels right.
- Aerating too long (or too late). Air only goes in cleanly while the milk is cool. Do all your stretching in the first few seconds; adding air once the milk is hot just makes big, dry bubbles.
- No whirlpool.If the milk isn't spinning, the bubbles never break down. Angle the tip off-center until you see a smooth vortex.
- Big bubbles you can see.That's foam, not microfoam — you added air too aggressively or too late. Swirl and tap to fix small amounts; steam again for a lot.
- Starting with warm milk or a full pitcher. Warm milk gives you no working window; an overfull pitcher overflows the second it expands.
- Letting it sit.Microfoam separates fast. Groom and pour within a few seconds, or you're pouring foam on top and milk underneath.
No steam wand? How to froth milk without one
You can get warm, foamy milk without a steam wand — just be honest about the ceiling. A machine's pressurized steam wand is what makes truemicrofoam, because it heats and textures at the same time under real pressure. Standalone gadgets add air to already-warm milk, which gives you lighter, drier foam that's great on a cappuccino or for coffee you'll drink through the foam, but won't pour tight latte art. With that expectation set, here are the workarounds, best to worst:
- Handheld electric frother.Warm the milk first (stovetop or microwave to 140–150°F), then whip with a battery whisk, moving it up and down through the surface. Cheap, fast, and the best no-wand result for foam volume. See our best milk frother picks for models that actually last.
- French press pump.Pour warm milk into a French press (no more than a third full), and pump the plunger up and down briskly for 20–30 seconds. The mesh screen breaks the bubbles down nicely — it's the closest a no-electricity method gets to fine foam.
- Jar and microwave.Half-fill a lidded jar with cold milk, screw the lid on tight, and shake hard for 30–60 seconds until it doubles in foam. Take the lid off and microwave 30–45 seconds — the heat sets the foam so it lasts long enough to spoon on top. Zero gear required.
If you've decided you want real microfoam, the honest answer is a machine with a proper steam wand. Our best latte machine roundup covers the options, and the Breville Bambino vs. Bambino Plus comparison is the classic beginner question — the Plus adds an automatic milk-texturing wand if you'd rather the machine hit the temperature for you.
Which pitcher to buy
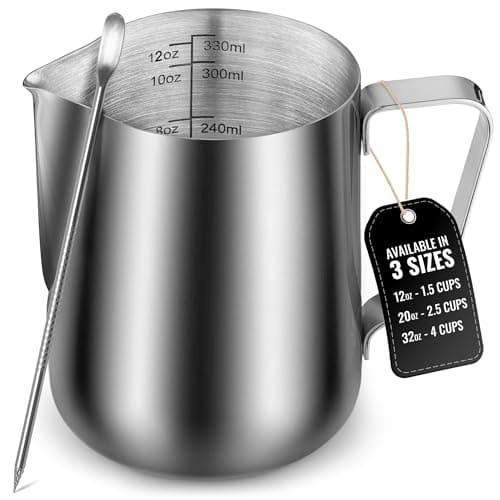
A good steaming pitcher makes microfoam dramatically easier, and it's inexpensive — around the price of a couple of bags of beans. You want stainless steel (so you can feel the temperature through the metal), a 12–20 oz size for one-to-two drinks, and a tapered spout for control when you pour. For your first pitcher, the Zulay Milk Frothing Pitcher is an easy, well-made pick: 304 stainless steel, a narrow pour spout, and interior measurement markings that help you fill to the right level every time.
Two alternatives worth knowing. If you get serious about latte art, many baristas prefer a Normcore handleless pitcher— going handleless lets you cradle the base to feel temperature directly and gives a more precise, controlled pour. And a classic De'Longhi stainless milk jug is a solid, widely available option that pairs naturally with their machines. Any of the three works; the pour spout and a size that matches your cup matter far more than the brand.
Once the milk is right, the rest of the drink is straightforward: our how to make a latte at home guide covers the ratio, the pour and the three ways to do it without an espresso machine.
Frequently asked questions
What temperature should I steam milk to?
Aim to stop at about 140-150F (roughly 60-65C). In that band the milk's natural sugars taste sweetest and the microfoam is glossy and stable. Above about 160F (70C) the milk scalds: the proteins break down, it loses sweetness, and it picks up a cooked, papery taste. If you don't have a thermometer, cut the steam the moment the base of the pitcher becomes too hot to hold.
What are the two phases of steaming milk?
First stretching (adding air) while the milk is still cool: keep the wand tip just below the surface until you hear a steady hiss, for only a few seconds for a latte. Then texturing (the whirlpool): submerge the tip slightly off-center so the milk spins in a smooth vortex, folding the air into fine microfoam while it heats. Add all your air early; once the milk is warm, you're only polishing the texture.
What milk steams best?
Whole milk is the gold standard — its fat and protein make the most forgiving, sweet, stable microfoam, so it's what to learn on. Among dairy-free options, barista-formula oat milk steams closest to whole milk, followed by soy; plain almond and coconut are the hardest to texture. If a plant milk isn't labeled 'barista,' expect thinner, less stable foam.
Can I make microfoam without a steam wand?
You can get warm, foamy milk without a wand, but not true microfoam. A pressurized steam wand heats and textures at once, which is what makes the tight, pourable foam for latte art. A handheld electric frother, a French press pump, or the shake-a-jar-then-microwave method all produce lighter, drier foam that's great on a cappuccino but won't pour fine latte art. For real microfoam you need a machine with a proper steam wand.
Why is my steamed milk full of big bubbles instead of smooth foam?
Big visible bubbles mean you added air too aggressively, or you kept aerating after the milk warmed up. Do all your stretching in the first few seconds while the milk is cool, then submerge the tip and get a steady whirlpool going to break those bubbles down. Swirling the pitcher and tapping it on the counter fixes small amounts; a lot of foam means steaming it again.
Sources
Keep reading
Buying your first setup?
See how we pick — compiled specs, cost-per-shot math, and honest trade-offs — then dig into the guides. No fake test lab, no rankings for hire.